11.2. Print Setup Dialog
The Print Setup dialog can be used to configure various printing options. Click on File->Print Setup to open the Print Setup dialog.
This dialog consists of four tabs, described in detail below. At the bottom of the dialog you will find the following buttons:
OK: saves the settings and closes the dialog.
Print: saves the settings and prints the current workbook using these settings.
Print preview: opens Print preview window which shows how this document would look if printed using currently selected options. This button keeps the Print Setup dialog open, so if you are not satisfied with the results, you can change the settings again.
Cancel: closes the dialog discarding the changes you made.
It is important to understand that Print Setup dialog sets the options for printing the current workbook (see below for multi-sheet workbooks). These options are part of the workbook; they are saved when you save the workbook and loaded when you open a workbook. For example, assume that you are currently working with workbook Workbook1 and set in Print Setup dialog Orientation: landscape, then save the workbook. If you open Workbook1 later and print it, it will be printed using landscape orientation. However, if you open another workbook (say, Workbook2) and print it, it will be printed using orientation which was set for Workbook2 (most probably, portrait).
For multi-sheet workbooks, Print Setup dialog actually sets print options for current sheet only, without affecting other sheets. For example, assume that have a workbook with two sheets, Sheet 1 and Sheet 2, and you want to have Sheet 2 printed at 80% scale (otherwise it does not fit on one page). To do so, switch to Sheet 2, open Print Setup dialog, select in it scale 80% and click Save. Now whenever you print Sheet 2, it will be printed at 80% scale; whenever you print Sheet 1, it will still be printed at 100%.
Finally, if you are printing more than one sheet in a multi-sheet workbook (for example, when printing the whole workbook), then all of them will be printed using the print setup options of the currently selected sheet. Thus, in the example of the previous paragraph, if you are printing both sheets at once (by selecting All in Print Sheets dialog), then the scale used will depend on which sheet is currently active. If Sheet 1 is the current sheet, then both sheets will be printed at 100%; if Sheet 2 is the current sheet, then both sheets will be printed at 80%.
11.2.1. Page Tab
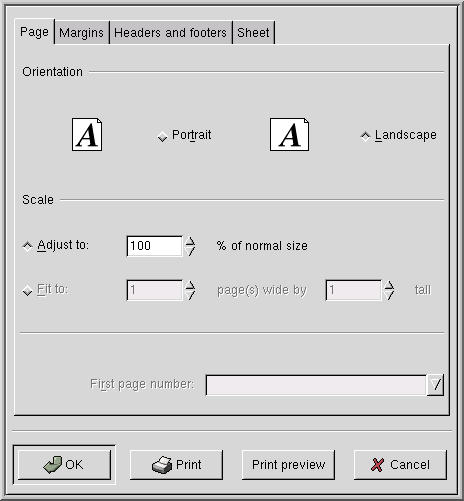
This tab allows you to select printing orientation (portrait or landscape) and scale. Values of scale greater than 100 percent produce image larger than natural size; values smaller than 100 percent produce image smaller than natural size (this can be used to make the printout fit on a page).
The Fit to option is not available yet.
11.2.2. Margins Tab
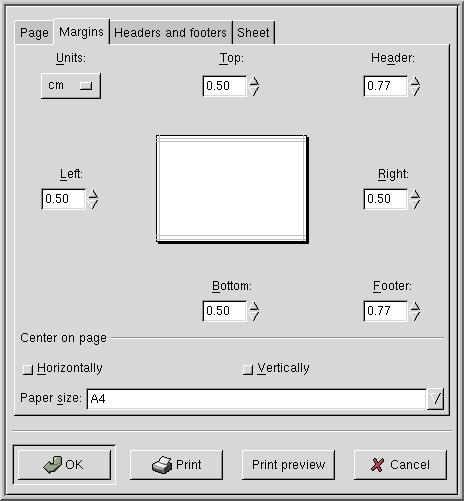
In this tab, you can select paper size (A4, US Letter, etc) and margins. To adjust the margins, enter the new value in the appropriate field or click on the arrow buttons next to a value. You will see the preview pane follow your changes. Header and Footer fields show how much space is left for page headers and footers (see Section 11.2.3). Be sure to leave enough space or the headers and footers will not be printed.
Units of measurement used for margins (cm, mm, points, inches) are shown in the upper left corner of the dialog. You can select the units from the drop-down list.
11.2.3. Headers and Footers Tab
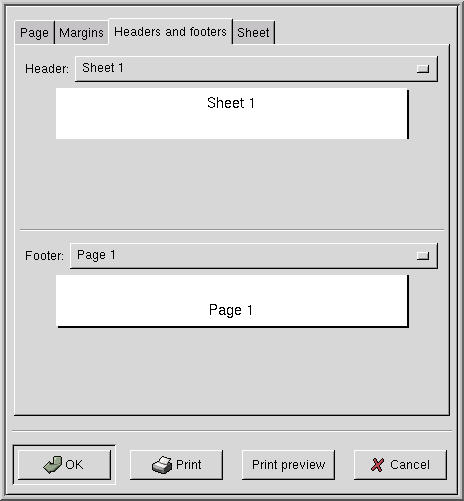
This tab allows you to set headers (text printed on top of the page) and footers (text printed at the bottom of the page). You can use the drop-down lists to select from one of standard styles or select Customize.. to create your own style. The preview area under the drop-down list automatically shows you the selected style. Please note that Sheet 1 will be replaced by the actual sheet name.
 | NOTE |
|---|---|
Sheet name is not the same as the filename: a workbook can contain many sheets, with different names. Sheet names are shown on the tabs at the bottom of the main Gnumeric window and can be changed by right-clicking on these tabs. |
 | TIP |
|---|---|
Double clicking on the header or footer preview will quickly allow you to customize that header or footer. |
11.2.4. Customizing Headers and Footers
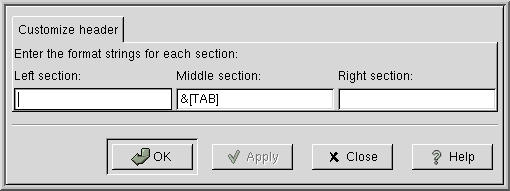
Enter what text you would like to appear in the header or footer. You can include sheet name, date and other information using the following special "codes":
- &[TAB]
Sheet name.
- &[PAGE]
Page number in the printing.
- &[PAGES]
Total number of pages in the printout.
- &[DATE]
Current date.
- &[TIME]
Current time.
11.2.5. Print Setup Dialog - Sheet
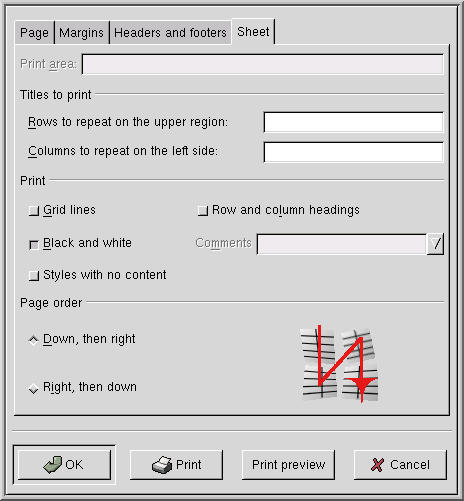
You can select rows or columns to be printed on every page of the output. This is commonly used for printing column or row names. To enable this, enter the range of cells to be repeated in Rows to repeat... or Columns to repeat.. field. Instead of entering them manually, you can also select columns or rows to be repeated using the mouse.
 | Warning |
|---|---|
Note that the rows and columns must be entered as ranges of cells. That is, if you want to have first row repeated, you must enter A1:IV1, not just 1. Similarly, to have column A repeated, you must enter A1:A65536. The Gnumeric developers are working on this shortcoming. |
Select Grid lines to print the cell grid lines with your document. Unselect the button to hide the grid lines from your print output.
Select Black and white to convert the colors in your document to a greyscale. This is recommended if you have a monochrome printer.
Select Styles with no content to print cells with non-trivial style (background, borders, etc.) even if they are empty. For example, if you have a number of cells with the background color changed but no data in them, you can select this option to ensure they are in the printed output.